 |
| Scott Dixon rolls through the Turn 9 Chicane during the GoPro Grand Prix of Sonoma at Sonoma Raceway — Photo Credit: John Cote |
IndyCar heads to Sonoma for the season finale this weekend with six drivers still eligible for the championship. Let’s take a look at the Engineering Guide for Sonoma Raceway in California.
Surface: Road Course
Distance: 2.385 miles
Laps: 85
Sonoma is IndyCar’s tenth road/street course of the season, and also one of the toughest. The track features very short straights (one is made out of the drag strip located at the circuit), an esses section, and a brake heavy hairpin that leads on to a curvy front stretch. Besides navigating a rolling start with other cars around them on a narrow front straight, drivers also need to be ready for the heavy braking section heading into turn 2. The steep turn coupled with the braking can upset the balance of the car and send drivers running wide in qualifying and at the start of the race.
The things teams will need to focus on this weekend are downforce through the high speed corners and acceleration rather than top speed. Cars don’t really get a good chance to top out going around this track, but getting up to speed on the slightly longer straights is imperative. Through the esses, maintaining momentum can really help you close up on a car that is struggling through the section. The hairpin like corners of 4 and 6 will provide some good overtaking opportunities in addition to the “classic” hairpin that is turn 11. A poor run out of the final turn will make you a sitting duck to cars behind on the front straight.
Sonoma is unlike almost any of the other road courses this series competes on. It doesn’t have a trademark long straight like we see in Long Beach or St. Petersburg. Therefore, it’s going to require a setup unlike any of the other tracks. Chevy have won six of the nine road/street course races this year, and they seem to have the upper hand heading into Sonoma as well. Their aero kit has been the winner most of the season despite Honda’s recent push in winning two of the last five road course races.
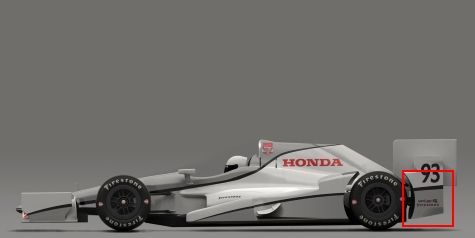
However, some of the reasons for Honda’s slower pace could be because of higher downforce levels on the stock aero kit setup. Their front wing element has always had downforce in mind, with three flap elements and two endplates holding two more flaps. This has slowed them down on the straights but will benefit them in the turns. Also, if you look at their rear pod (pictured in red below), you can see the curved bottom edge that serves as a diffuser for the car. It sucks the air out from beneath the car, lowering the air pressure and therefore increasing downforce without adding any additional drag.
Chevy opted for an angle parallel (no curve up) to the ground which makes their diffuser less effective. I don’t know if it will allow them to outrace the Chevy’s and win, but it could certainly help make them more competitive on a track where mid to high speed corners are plenty.
Update: 8/29 – If you have any more questions about the cars or Sonoma Raceway (or IndyCar engineering in general), let me know in the comments below and I’ll do my best to answer!


Very interesting article, thank you!
LikeLike
Thanks for the comment! Glad you enjoyed the article.
LikeLike